Writing the Motion Application Code
To begin editing code in Visual Basic, right-click on the form and select “View Code.” This will open the Visual Basic Express code editor as a new tab called “Form1.vb.” The code editor should be blank, as shown below.
Next, you will add subroutines for each form control and specify their functionality by adding MPX code.
Set the Default Motion Parameters
Click on the “Form1.vb [Design]” tab to return to the Visual Basic design view. Add a subroutine for the form by double clicking on a blank area of the form. Visual Basic will return you to the code editor with the newly generated subroutine Form1_Load as shown below.

To assign Axis 0 to Motion Object 0, add the highlighted code below to the Form1_Load subroutine:
Private Sub Form1_Load(ByVal sender As System.Object, _ ByVal e As System.EventArgs)Handles MyBase.Load Controller.Motion(0).AxesClear()
Controller.Motion(0).AxisAdd(0)
Controller.Motion(0).DefaultSpeed = 1000
Controller.Motion(0).DefaultAccel = 10000
Controller.Motion(0).DefaultDecel = 10000
End Sub
The preceding code performs three actions:
- Controller.Motion(0).AxesClear() removes all axes currently mapped to Motion Object 0 to ensure that Motion Object 0 is available.
- Controller.Motion(0).AxisAdd(0) maps Axis 0 to Motion Object 0
- Finally, Motion Object 0 is assigned a default speed, acceleration, and deceleration
Set the Move Button Action
Return to the Form1.vb [Design] tab and double-click on the Move button you placed on the form earlier. This will generate the MoveButton_Click subroutine that will allow you to specify what action to take when the Move button is clicked.
Add the highlighted code below to the MoveButton_Click subroutine:
Private Sub MoveButton_Click(ByVal sender As System.Object, _
ByVal e As System.EventArgs) Handles MoveButton.Click
Controller.Motion(0).Trapezoidal(Target.Text)
End Sub
The preceding code tells Motion Object 0 to perform a trapezoidal move to a position specified by the text box named “Target.”
Update the Axis Position Display
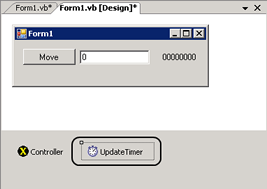
Return to the design view and double-click on the UpdateTimer control to create the UpdateTime_Tick subroutine in the code editor.
Add the highlighted code below to the UpdateTimer_Tick subroutine:
Private Sub UpdateTimer_Tick(ByVal sender As System.Object, _ByVal e As System.EventArgs) Handles UpdateTimer.Tick
ActualPosition.Text = Controller.Axis(0).ActualPosition
End Sub
This code will update the display of the axis position.
The application is now ready to be run. Press the F5 key or click the  (run) button to start the application. Enter 5000 in the text box and click the Move button. The axis will move to position 5000 and the current axis position will be displayed. (run) button to start the application. Enter 5000 in the text box and click the Move button. The axis will move to position 5000 and the current axis position will be displayed.
Congratulations
You have just completed your first application with the MPX library. In the next section, you will learn to generate a simple error and how to handle such errors to make your application more reliable.
Previous | Next |

