Design the Form
Add the Controller Object
Click on the Toolbox Tab to open the Toolbox Panel. Click on the MPX By Danaher Motion tab. To add the MPX .NET Controller control to the form, double click on  or drag and drop the object onto the form. or drag and drop the object onto the form.
Note: If the MPX By Danaher Motion tab is not present, then you must add it manually by following the steps outlined in Adding MPX Items to the Toolbox.
In the Properties window (shown on the right), set the name of the MPX control to “Controller” by changing the Name property.
Add the AssertHandler Object
Return to the Toolbox Panel and add an MPX AssertHandler control by double-clicking on  . .
The AssertHandler control allows for critical library errors (assertions) in the MPX library to be displayed in a message box. If an assertion occurs, this information should be forwarded to Kollmorgen. See MPX Error Handling for more on assertions.
Add a Button
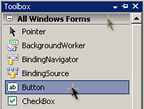
Add a button control to the form by clicking on the All Windows Forms tab in the Toolbox Panel and double clicking on Button.
In the Properties window, set the following properties for the Button control:
Property Name |
Property Value |
Name |
MoveButton |
Text |
Move |
Add a TextBox
On the All Windows Forms tab, double click on the TextBox control to add a text box to the form. In the Properties window, set the following properties for the TextBox control:
Property Name |
Property Value |
Name |
Target |
Text |
0 |
Add a Label
On the All Windows Forms tab, double click on the Label control to add a label to the form. In the Properties window, set the following properties for the Label control: 
Property Name |
Property Value |
Name |
ActualPosition |
Text |
00000000 |
Arrange the button, textbox and label controls as shown in the following image. Resize the form to an appropriate size.
Add a Timer
In the Toolbox panel, under the All Windows Forms tab, double click on Timer to add it to the form. The Timer control will be used to update the ActualPosition label with the current position of the axis in 50 millisecond intervals.
In the Properties window, set the following properties for the Timer control:
Property Name |
Property Value |
Name |
UpdateTimer |
Interval |
50 |
Enabled |
True |
All the necessary controls have now been added to your form. In the next section, you will write the code that will add functionality to your application.
Previous | Next
|

