|
|
| . |
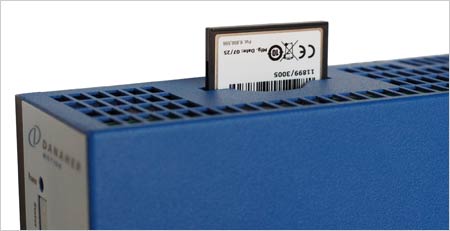
eZMP StartupAfter you have set up the eZMP-Synqnet for standalone operation or remote operation via a connection to a local area network or a crossover cable, you will be ready to boot up the eZMP for the first time. Follow the instructions below to insert the compact flash and boot up the eZMP. Inserting the Compact FlashThe compact flash card should be inserted in the compact flash slot on the top of the eZMP. To correctly insert the compact flash, orient the compact flash card so that the bar code and serial number printed on the card is facing the top (blue surface) of the enclosure as shown below. The compact flash should slide in easily and require a minimum of firm pressure to seat securely in the slot. CautionDo not force the compact flash into the slot on the eZMP. Doing so may damage the connectors on the main board. The compact flash should slide easily into the slot and a minimum of firm pressure to insert completely. When inserted correctly the compact flash card should be flush with the enclosure.
CautionDo not insert or remove the compact flash card while the eZMP is running. Removing the compact flash during operation can corrupt the compact flash memory and render it unusable. Connecting the PowerThe eZMP will begin booting as soon as power is connected. When connecting power to the eZMP make sure that the power connector is inserted firmly and securely. Use the fasteners on the connector to ensure a secure connection. AttentionUse only the specified power supply and connector with the eZMP. For more information on the eZMP’s power supply and connector DC Power Connector. CautionDo not remove power from the eZMP while Windows XPe is still running. Always use the Windows shut down dialog box to first shut down Windows before disconnecting power. See Proper Shut Down and Reboot for instructions on safely shutting down and rebooting the eZMP. 7-Segment Display Boot IndicatorThe eZMP features a 7-segment display for showing important status and error information.
The 8. code is displayed when Windows is first booting up. The code is also displayed after Windows has shutdown and it is safe to remove power. See Proper Shut Down and Reboot for instructions on safely shutting down and rebooting the eZMP. Windows Loaded Indicator
When Windows is loaded, there are no temperature or voltage faults, and no user output is being displayed, the L. character is displayed to indicate that the system is running with no errors. For more information on the eZMP 7-segment display and other display codes, see 7-Segment Display.
<< Setting up the eZMP | Quick Start Contents | Enabling UPnP on the Host System >>
|
| | | Copyright © 2001-2021 Motion Engineering |