Getting Started with MechaWare
Get Simulink to use MechaWare Blocks
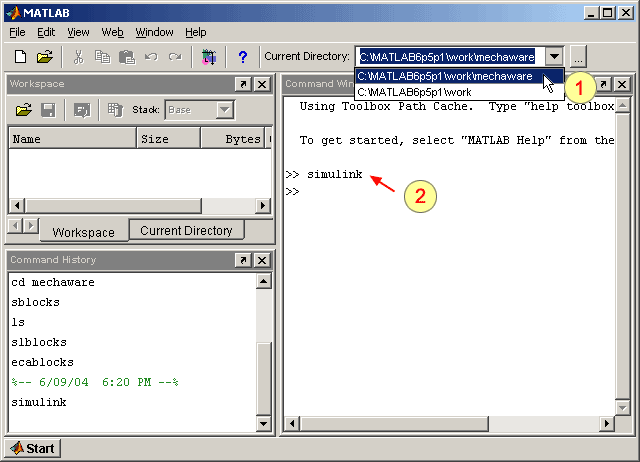
- Open Matlab. Change the current work directory
to the Matlab\work\mechaware directory. In the example below,
we selected C:\MATLAB6p5p1\work\mechaware by using the Current
Directory drop down box.
Type simulink in at the Matlab command line to open Simulink.
| |
>>MechaWare Tip
To keep from having to change the directory every time you use MechaWare,
you can manually change the default path in Matlab. To learn how,
click here. |
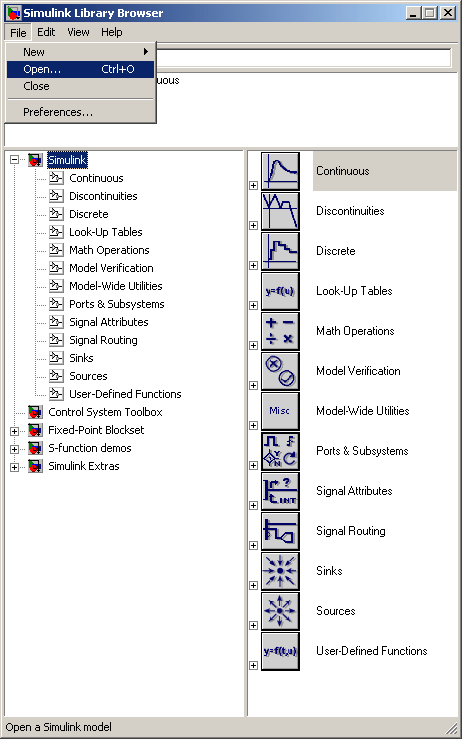
- In Simulink, click File > Open.
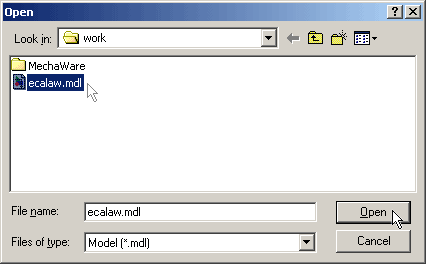
- Select ecalaw.mdl in your Matlab\work
directory and click Open.
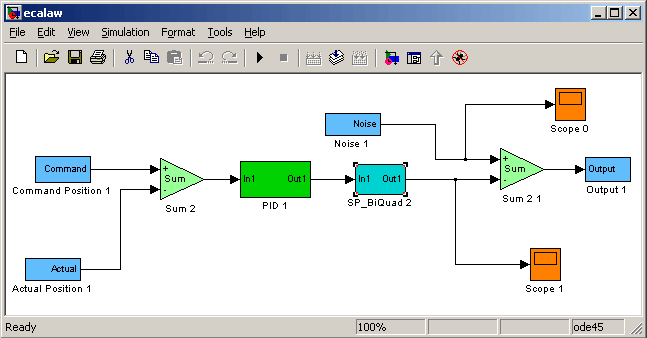
- You will now see ecalaw.mdl, which
is a simple PID loop with a low pass 400 Hz corner frequency.
Using MechaWare Blocks
Now that we have the sample control loop ecalaw.mdl
open, let's look into how the control loop is made up of different basic
blocks. The screenshot of ecalaw.mdl below should look familiar since
it's a slightly modified PID loop.
Here is a quick breakdown of the blocks in the diagram
above.
NOTE: The titles below the blocks are generic
names and can be changed by the user to any Simulink-valid name.
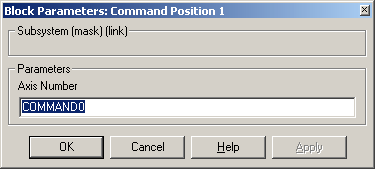
Command Position 1
The Command Position actually represents the command position of the specified
Axis. In our example, Command Position 1 represents the command position
of Axis 0.
If you double-click on the Command Position 1 block
you will notice that the Command Position is coming from Axis 0. In this
example, the Axis Number is set to COMMAND0. However, if we wanted the
Command Position from Axis 4, we can change the Axis Number and set it
to COMMAND4.
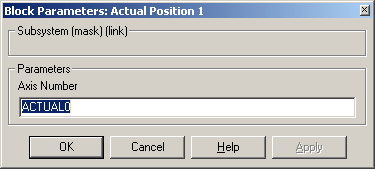
Actual Position 1
Similar to Command Position, Actual Position actually represents the Actual
Position of the specified Axis.
If you double-click on the Actual Position 1 block you
will notice that the Actual Position is coming from Axis 0. In this example,
the Axis Number is set to ACTUAL0. However, if we wanted the Actual Position
from Axis 4, we can change the Axis Number and set it to ACTUAL4.
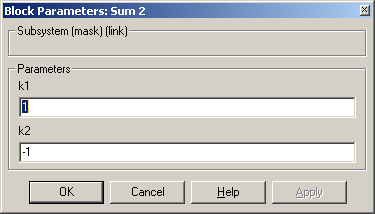
Sum2
This is a summing block with variable gains on each input. Double-click
on the Sum 2 block to adjust the gains.
K1 sets the top input gain (+ label
on the block).
K2 sets the bottom gain (-1 label
on the block).
K1 = 1 and K2 = -1, makes the summing block a difference block.
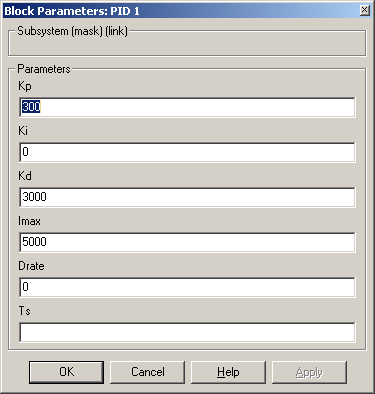
PID 1
Double-clicking on the PID 1 block will show the PID gains in the PID
block. The PID gains are consistent with the standard PID loop in the
XMP. The variable Ts is the sample time of the system and is only
used in Simulink simulation—it is never used on the controller.
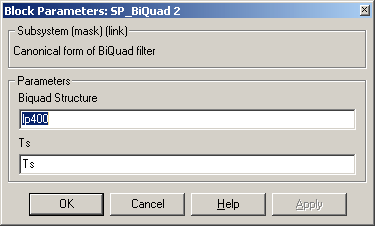
SP_Biquad 2
This block is a biquad (2nd order digital filter). Double-clicking on
this block shows two variables: Biquad Structure and Ts.
The Biquad Structure is the structure that specifies
the filter to be used. In this case it looks for lp400.txt. We
will discuss how to set these filters in a later section.
Ts is the sample time of the system in seconds.
Ts is only used in Simulink simulation—it is never loaded to the
controller.
Output 1
The Output 1 block writes the result to the torque command (i.e. DAC Output)
to the motor specified. Double-click on the Output 1 block to set the
motor that is used in this block. In our example, MOTOR0 sends torque
commands to Motor 0. Setting it to MOTOR5 would send torque commands to
Motor 5.

Previous | Back
to Table of Contents
|