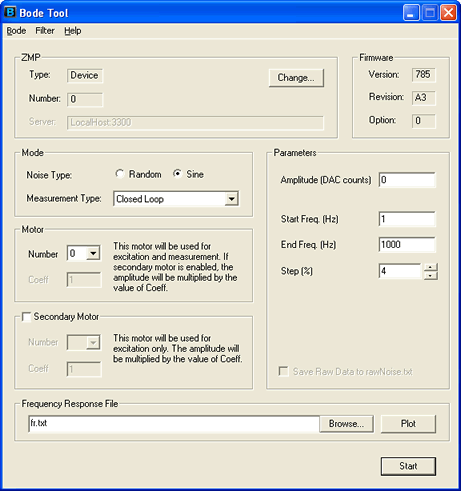
Main Dialog (Standard and MechaWare)
The main Bode Tool dialog contains all settings required for a measurement. There are two variations of the main dialog corresponding to the current controller’s firmware options. The Standard and MechaWare forms of the dialog are shown below.
Standard Firmware Form
MechaWare Firmware Form
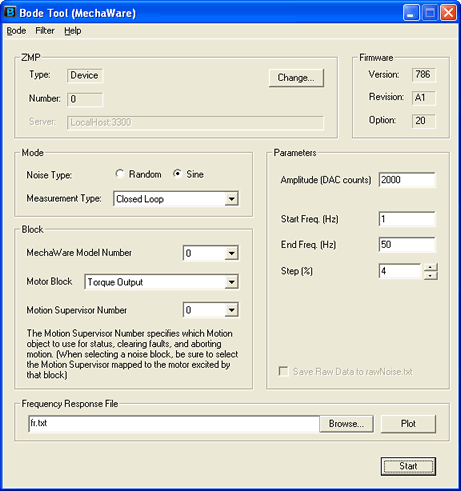
Note: Standard form has Motor and Secondary Motor options where the MechaWare form has Block.
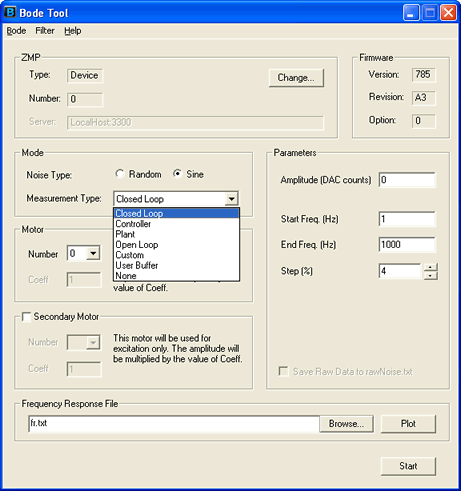
Measurement Type
The measurement type drop down box lets you select at which points in your system measurements are made. The types include: Closed Loop, Open Loop, Controller, Plant, Custom, User Buffer, and None.
Note: Controller and Plant measurement types are not available under MechaWare.
The examples below were taken from using a Trust TA 9000.
Closed Loop
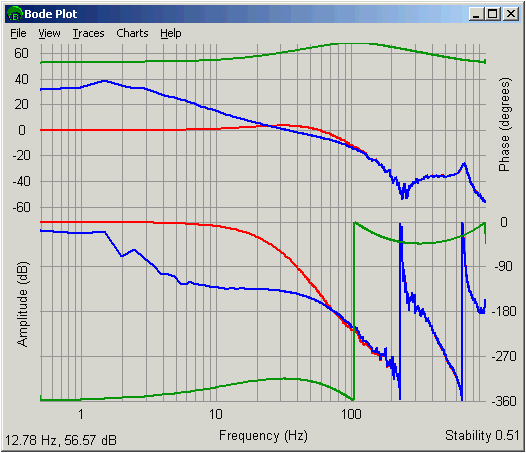
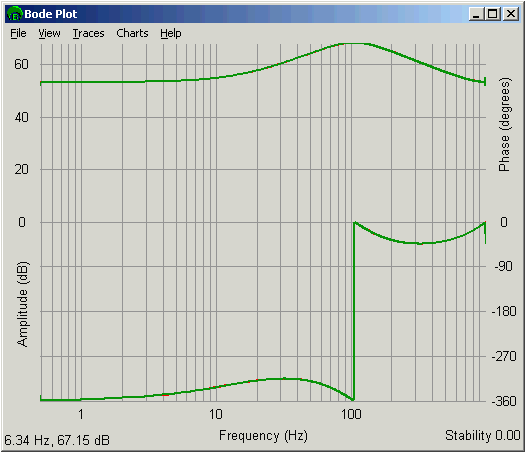
This measures the Closed Loop Response of the control system. There must be a non-zero controller (i.e. at least one non-zero PID / PIV parameter and non-zero biquad response - default biquad response if unity). The closed loop response is displayed as the closed loop response in the View window. The red trace is the closed loop response, blue open loop (simulated from closed loop response), and the green is the controller simulation response.
Controller
This measures the response of the controller ((PID / PIV) + biquad). The response of this measurement should match the filter simulations in the View window. There must be a non-zero controller (i.e. at least one non-zero PID / PIV parameter and non-zero biquad response - default biquad response if unity). The controller response will be displayed as the closed loop response in the View window. It is difficult to see, but there is a red trace (measured filter response) under the green trace (simulated filter response).
Note: The Controller measurement does not work with MechaWare.
Plant
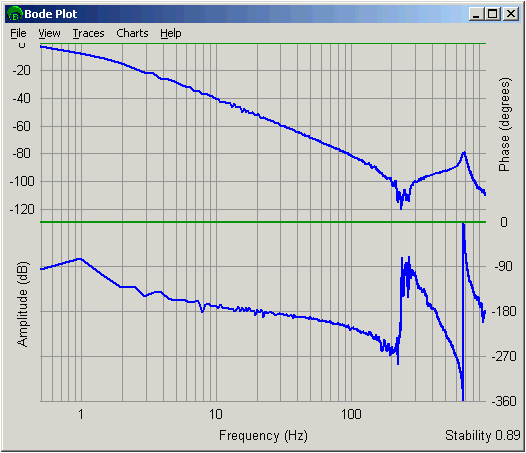
This measures the Plant Response of the system outside the controller (i.e. amps, motors, and mechanical system). This test does not require PID / PIV / Biquad Parameters. The Plant response will be displayed as the open loop response in the View window. The following plot shows the plant response (blue trace) and the controller response under the test conditions (green trace).
Here is the same test performed when Kp, Ki, and Kd parameters all equal zero. The plant data is the same. The filter data is shown as 0dB, 0 degrees when there are no filter parameters.
Note: This Plant measurement does not work with MechaWare.
Open Loop
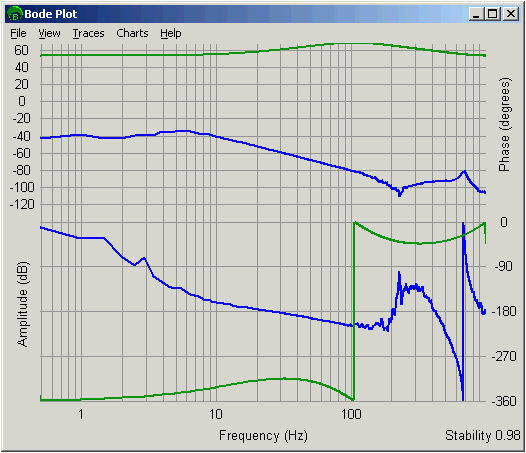
This measures the Open Loop Response of the control system. There must be a non-zero controller (i.e. at least one non-zero PID / PIV parameter and non-zero biquad response - default biquad response if unity). The open loop response will be displayed as the open loop response in the view window. This measurement is the direct measurement of the open loop simulation provided in the closed loop measurement described above.
The following plot shows a blue trace (measured open loop response), red trace (closed loop response simulated from a measured open loop response), and a green trace (simulated filter response).
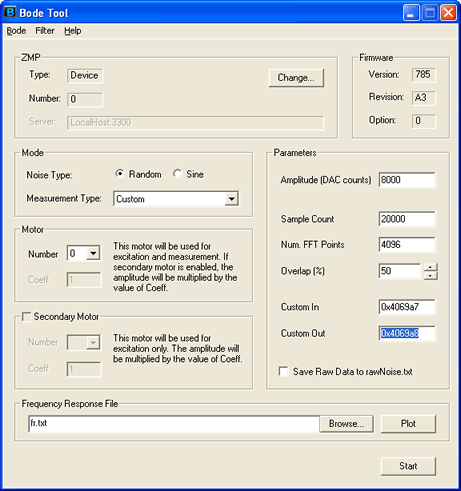
Custom
This mode allows advanced users to perform a dual channel DFT on any two memory locations in the controller to allow measurements that are not imagined by the Bode Tool author. The user needs to specify the controller memory address and type (INT16, INT32, INT64, FLOAT, or DOUBLE) for each memory location.
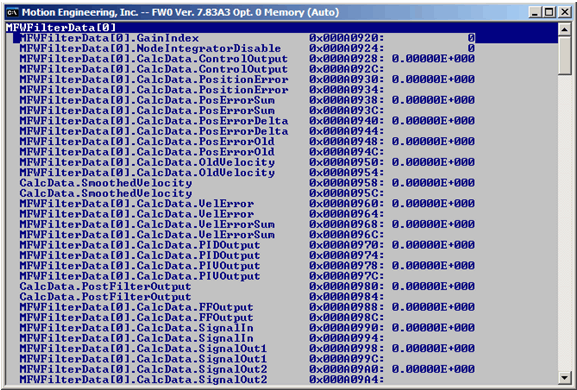
To specify the controller memory address, VM3 is a handy tool to visually browse the controller memory. An example is shown below where the position error is desired and is shown to be at address 0xa0930.
Specifying addresses in the Bode Tool
First, select the Custom test type. To specify the address, simply enter the hex address, led by "0x" in the In and Out edit boxes in the Bode Tool. These memory locations are assumed to contain double precision floating-point numbers. To change the data type, you will need to modify the bode.ini file (see below).
The following example shows the address 0x4069a7 set for the input address and 0x4069a8 as the output address.
Specifying addresses in bode.ini
To specify the data type, the bode.ini file must be modified. The bode.ini file tells the Bode Tool its settings on start up and saves current settings on closing. The following settings will be needed in bode.ini.
A dual channel DFT, such as the one used in the Bode Tool, is made up of and input and output. For instance, in a plant measurement, the input is the commanded torque, and the output is the actual position.
customPointIn - This is the input address for the dual channel dft. This value is a hex address.
inputType - This specifies how the data at customPointIn is interpreted. Possible values are INT16, INT32, INT64, FLOAT, and DOUBLE. The default is DOUBLE.
customPointOut - This is the output address for the dual channel dft. This value is a hex address.
outputType - This specifies how the data at customPointOut interpreted. Possible values are INT16, INT32, INT64, FLOAT, and DOUBLE. The default is DOUBLE.
A sample configuration is shown below (from bode.ini) for reference:
customPointIn 0x28d4c
inputType INT32
customPointOut 0x28d45
outputType DOUBLEc
The custom mode will return the frequency response of the input vs output as the closed loop trace. The open loop trace will be calculated, but may or may not be appropriate depending on the points you choose to measure.
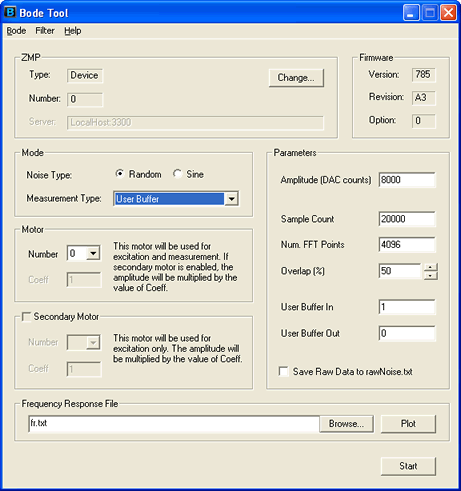
User Buffer
The User Buffer test type was created to simplify MechaWare DFT testing. The values recorded in the User Buffer mode are assumed to be doubles. To select the address, simply enter the user buffer index in base 10. The following example shows User Buffer 1 as the input and User Buffer 0 as the output. User Buffer inputs are limited to 0-1023 (valid range of user buffer indices)
Specifying addresses in bode.ini
To specify the data type, the bode.ini file must be modified. The bode.ini file tells the Bode Tool its settings on start up and saves current settings on closing. The following settings will be needed in bode.ini.
A dual channel FFT, such as the one used in the Bode Tool, is made up of and input and output. For instance, in a plant measurement, the input is the commanded torque, and the output is the actual position.
userBufferIn - This is the input address for the dual channel fft. This value is a hex address.
inputType - This specifies how the data at userBufferIn is interpreted. Possible values are INT16, INT32, INT64, FLOAT, and DOUBLE. The default is DOUBLE. For MechaWare systems, the output type of the MEMOUT_USER block must match this type.
userBufferOut - This is the output address for the dual channel fft. This value is a hex address.
outputType - This specifies how the data at userBufferOut interpreted. Possible values are INT16, INT32, INT64, FLOAT, and DOUBLE. The default is DOUBLE. For MechaWare systems, the output type of the MEMOUT_USER block must match this type.
A sample configuration is shown below (from bode.ini) for reference:
userBufferIn   0
inputType DOUBLE
userBufferOut 1
outputType DOUBLE
The custom mode will return the frequency response of the input vs. output as the closed loop trace. The open loop trace will be calculated, but may or may not be appropriate depending on the points you choose to measure.
None
Selecting None as the measurement type injects random noise or a fixed frequency signal into your system. However, no measurements are performed.
Amplitude
The sine test signal is scaled in DAC counts. The Amplitude is the peak amplitude of a sine sweep. Valid values are between 0 - 32767 (10 Volts output). Care should be taken to make sure that no clipping occurs. Values of 15000 or less are typically clipping free, but systems with a large resonances can clip even with lower values.
Abort Button
WARNING: A sine sweep can take a long time and can easily introduce too much energy into a system if configured incorrectly. This can result in resonances being excited for a long period of time and possible overheating of motors. The Bode Tool does not have any way to recognize that a system has gone into an uncontrollable oscillation. The user is responsible for choosing parameters that will not result in dangerous or damaging motion if a physical motor is connected. If dangerous motion does occur, click on the large abort button that pops up upon the start of the test. The user can also press the space bar or the enter button to do the same when the abort button has focus (active window). Pressing the escape key will cause the test to end, but the motor will remain enabled.
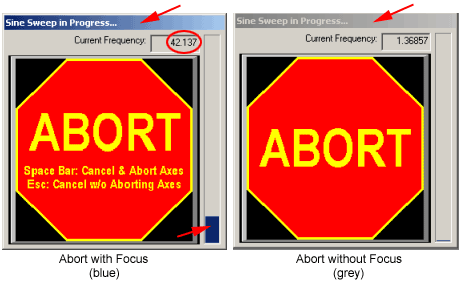
An abort causes the axis being tested to perform an abort action, perform a stop action on the phantom axis, and return the settings to their original state (remove sine sweep specific settings or turn off noise excitation). The abort action is caused by a user limit that the Bode Tool automatically configures. If all the user limits are previously used when the Bode Tool needs one, then the Bode Tool will just disable the motor's amplifier, instead of causing an abort event.
If the large abort button does not have focus (grey title bar), the space bar and enter button will not stop the test. The abort will lose focus when the mouse is clicked outside the large abort button window. Loss of focus can be seen by a change in the appearance of the abort button and a change in the abort button window title bar (turns to grey).
The vertical bar indicates the current progress. When doing a sine sweep, the Current Frequency is also shown in real time. When doing a random noise test, the time remaining is displayed.
Motion States
The Bode Tool will attempt to clear errors on the phantom axis. If for some reason, the error will not clear, the program will pop up an error window asking you to fix the problem. An error state on the axis being tested will generate this pop up window:
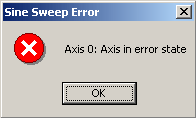
If the axis being tested has an error, the program will not start testing until the error is cleared. Use Motion Console or a similar application to clear the error and start another test.
Standard Firmware Specific

First Motor Number
This is the motor number of the primary motor to test. This list is automatically populated with enabled motor objects (object enabled in firmware, not enabled at the amplifier). The number of enabled firmware motor objects can be modified in Motion Console -> Controller Summary -> Config -> Motor Count.
First Motor Coefficient
This number scales the sine sweep signal for testing. When testing a single motor, this number should be left at 1.0. When testing two cross-coupled motors with different effective torque constants, this number can be useful. The allowed range on this number is +/- 2.0.
Second Motor Number
This number is similar to the first motor number. This number is only used if the check box next to the Second Motor Number edit box is checked. If that box is unchecked, no excitation will be sent to a second motor, nor will any data be calculated for a second motor. Two motors are often excited simultaneously if two motors are cross-coupled.
Second Motor Coefficient
The second motor coefficient is similar to the first motor coefficient. If the First and Second Motor Coefficients are both 1.0, the same excitation signal will be sent to both axes. If the signals are opposite in sign, the excitation will be effectively out-of-phase. If the cross-coupled axes do not have equivalent, effective motor torque constants, scaling the Second Motor Coefficient value to a value other than 1.0, while keeping the First Motor Coefficient = 1.0 will provide the intended flexibility when testing. This adjustment can be helpful when testing scara and other complex, cross-coupled axes. It will help differentiate between the cross coupled behavior associated with a derived/complex coupled axis showing motional interation and axes from a single non cross-coupled axis that showing no such interaction.
MechaWare Firmware Specific
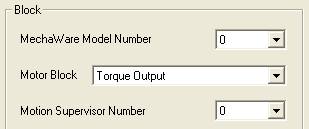
Model Number
This list will be populated with model numbers which are non-empty. Models can be downloaded with the mdl2mw.exe utility. The selected model number becomes the active model number for all BodeTool features (i.e. when selecting blocks in the Filter Tool).
Block Selection
Depending on the measurement type, this list selects a noise block or a motor block. Custom and User Buffer modes result in this list being populated with blocks of type ‘Noise’. All other measurement types populate with blocks of type ‘Torque Output’ and ‘Demand’. Only blocks from the currently selected model number will show up in this list.
Depending on the measurement type, you can choose from either a list of noise or motor block sources. Custom and User Buffer measurement types populates the list with Noise type blocks. All other measurement types populate with blocks of type Torque Output and Demand. Only blocks from the currently selected model number display in this list.
Motion Supervisor Number
The Motion Supervisor Number specifies which Motion object to use for status, clearing faults, and aborting motion. This value defaults to the MPI motor number associated with the selected motor block upon selecting a different motor block, but can be manually overridden afterwards. When instead selecting a noise block, this value always defaults to the current model number, and it is up to the user to ensure that this value is set to the motion object number mapped to the motor excited by the selected noise block (as implied by the connectivity of the selected downloaded model).
Note: For more information, see Filter Tool - MechaWare Firmware.
Previous | Next
|

