|
|
| . |
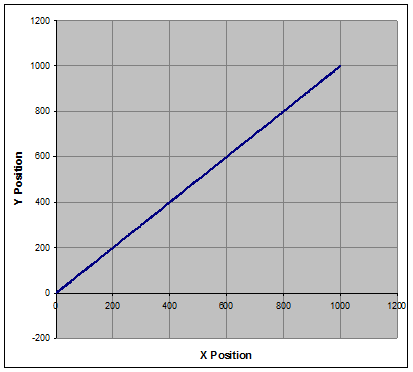
Geometric Path MotionSee also: Geometric Path Motion API Reference page. IntroductionGeometric Path Motion allows complex 2D and 3D paths to be specified using simple geometric elements (arcs and lines). It is used when 2 (or more) axes need to follow a specified coordinated position path. Unlike point-to-point motion, where the shortest path to the final position is the desired path, in geometric path motion the user defines a desired path. Path motion is useful for applications that need to move an end effector in 2D or 3D space. Examples are robots, laser cutting or water jet cutting machines, welding, painting, gluing, and CNC machining. For example, a point-to-point move from 0,0 to 1000,1000 gives the shortest distance path.
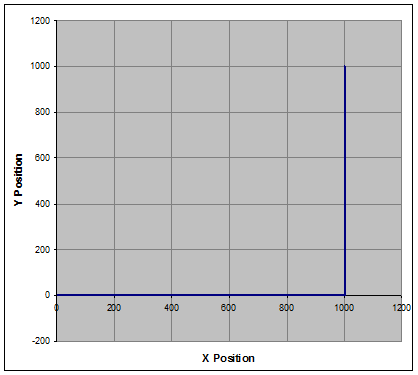
Two point-to-point moves 0,0 to 1000,0 to 1000,1000 would allow the path to go around a corner. But, a sharp corner requires the X-axis to start/stop, then the Y-axis to start/stop.
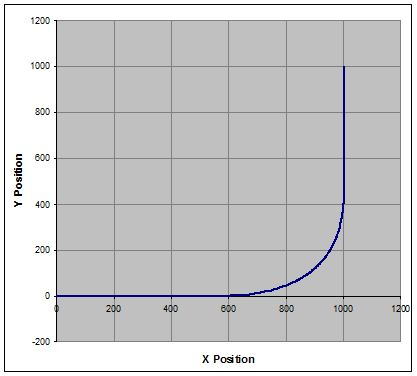
A path move with two sections, from 0,0 to 1000,0 and 1000,0 to 1000,1000 provides a smooth corner, where the Y-Axis starts moving before the X-Axis reaches its target position.
The path planner tries to approximate the desired path as close as possible using interpolation. The path error is the difference between the desired path and the interpolated path. For example, in the path with two sections, from 0,0 to 1000,0 and 1000,0 to 1000,1000, the maximum path error occurs at the corner.
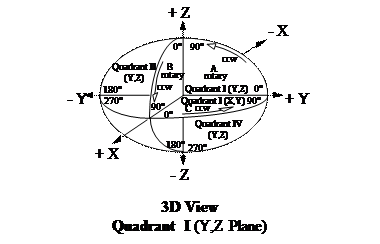
The path planner creates the interpolated points based on the specified path sections (lines or arcs) and the velocity, acceleration, and/or time constraints. There are several different types of interpolation techniques, each with different characteristics. Path ElementsThere are two basic elements used to specify each section in a path, lines and arcs. The line element is a straight section, with no curvature, bounded by two distinct endpoints. The previous coordinate position point (or the start point for the first line) and the next coordinate position point define the endpoints for the line. Lines can be 2, 3, or more dimensions (up to 16). The circular arc element is a segment of the circumference of a circle. The path planner supports circular arcs in 2D and 3D. The arc section can be defined several different ways: 2D - Arcstart angle – initial angle in degrees of the circle to define the starting orientation The start angle is defined as follows:
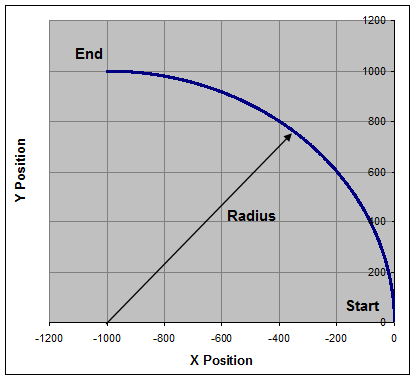
2D – Arc Centercenter – the x, y position coordinates for the circle’s center Example
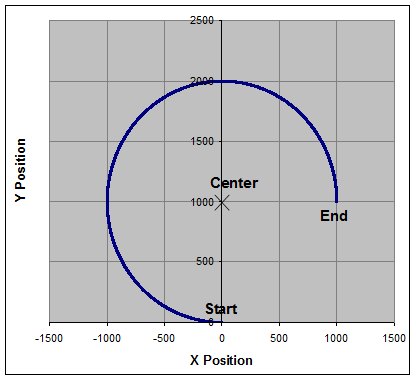
2D and 3D Arc Endpointcenter – the x, y or x, y, z position coordinates for the circle’s center
Example
Arc LimitationsFor Arc Endpoint path elements, the starting and ending radius may be different which will produce a non-circular arc (spiral). If a circular arc is desired, path attribute ("MPIGeometricPathElementAttrMaskRADIUS_TOLERANCE") may be specified which restricts the difference between the starting and ending radii. Be careful with Arc Endpoint when specifying a 3D arc where the starting, center, and ending points are on the same line. For example, if the start point is 0, 0, 0 and the center is 500, 0, 0 end point is 1000, 0, 0 the arc is 180 degrees, but only the X dimension is specified. There are many possible solutions, but the path planner will choose a 2D arc in the X, Y or the X, Z plane. Programming StepsGenerating a path move requires a few steps:
Interpolation and Move TypesThere are two basic point types: PT and PVT. The PT points contain positions and time deltas. The PVT points contain positions, velocities, and time deltas. The path planner generates either PT or PVT points depending on which interpolation type is specified by the user. The PVT interpolation type will generate PVT points. All other interpolation types will generate PT points.
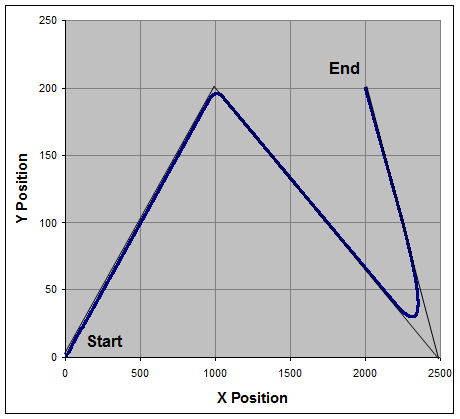
The PT, Bessel, Spline, Bspline, and BSpline2 interpolation types will generate points spaced by the specified timeSlice value. The path planner will attempt to meet the specified velocity. The acceleration parameter is ignored. The path error and accelerations are dependent on the specified velocity and timeSlice. Smaller timeSlice values will cause larger path accelerations and smaller path error. And conversely, larger timeSlice values will cause smaller path accelerations and larger path error. While it is possible to use different timeSlices, the resultant interpolated path is more intuitive if the timeSlice value is constant. The PVT interpolation type will generate the minimal number of points possible by using the specified velocity and acceleration parameters. The path planner will attempt to meet the specified velocity and acceleration. The timeSlice parameter is ignored. The path error is dependent on the ratio between the velocity and acceleration parameters. Smaller ratios (Velocity / Acceleration) will cause larger path errors. And conversely, larger ratios will cause smaller path errors. Since the timeSlice value is ignored, the interpolated PVT points will have variable time deltas, depending on the path, velocity, and acceleration. Blending SectionsThe interpolated points are generated based on the user specified path elements (lines and arcs) and the path element junctions. The path planner blends each path element with the previous path element to generate a smooth transition. The amount of blending between successive path elements depends on the interpolation type, the angle between elements, the specified velocity, and acceleration. PVT – The maximum blending time is 2.0 * Velocity / Acceleration for TRAP profiles and 4.0 * Velocity / Acceleration for SCURVE. The blend time is reduced based on the angle between the path elements. A sharp corner requires more blending, while a shallow corner requires less blending. 2D Line Blending Example: 0,0 to 1000,200 to 2500,0 to 2000,200
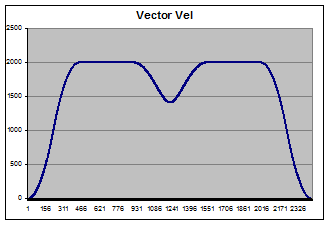
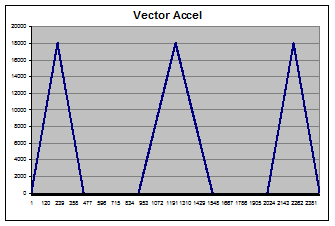
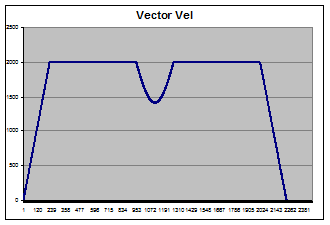
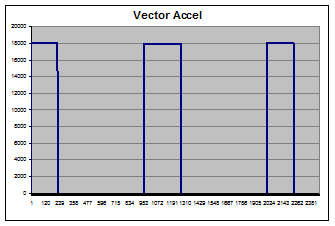
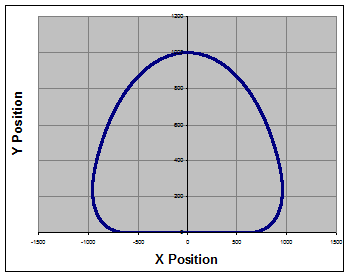
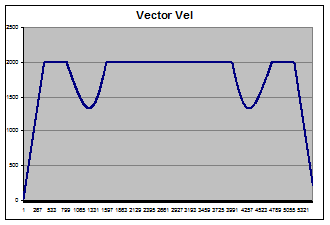
The PVT path planner calculates the point time deltas to split the blend time, so half the blend occurs before the junction and half the blend occurs after the junction. BSpline – The blending time is 4.0 * timeSlice. Since the interpolation points are spaced at constant timeSlice intervals, the blending time may not be evenly split around the junction. The maximum blend time imbalance around the junction is one timeSlice. Trap vs. S-Curve ProfileThe PVT interpolation type generates either Trapezoidal or S-Curve velocity profiles. The SCURVE profile uses 100% jerk for the acceleration portion of the profile. Using TRAP profiles will use half the blend time as SCURVE profiles. Example Using SCURVE profile plan type, the position, vector velocity, and acceleration profiles are as follows:
Using TRAP profile plan type, the position, vector velocity, and acceleration profiles are as follows:
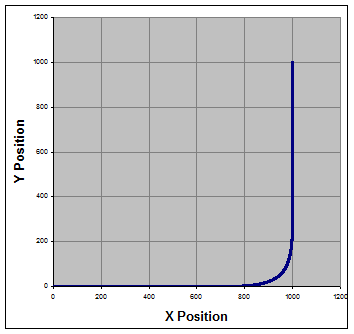
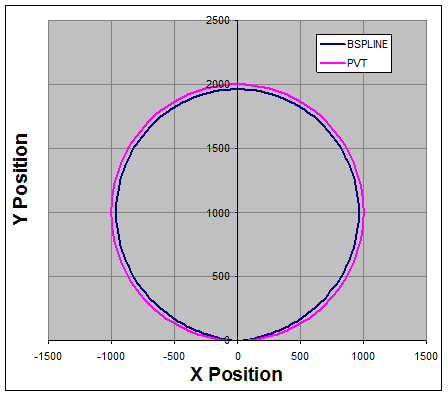
The difference between the profiles is smoother velocity transitions for SCURVE, but longer move time. For TRAP profiles, the corners are tighter and the total move time is shorter. Arcs and Centripetal AccelerationThe axis acceleration profiles for circular arc segments are different from lines. To generate a line, the axes accelerate at the beginning and end of a line. To generate an arc, the axes must accelerate sinusoidally through the entire arc segment. Placing the interpolated points closer together will greatly improve the accuracy and smoothness of an arc. The resultant acceleration vector, pointing towards the circular arc center is the centripetal acceleration. The minimum arc radius is dependent on the path velocity along the circumference and the acceleration: PVT – The interpolated point time delta for arcs is 2.0 * controller sample period. The path planner will return an error if it cannot meet the velocity and acceleration constraints for the arc radius. Bspline – The interpolated point times are the same as lines, the specified timeSlice. The path planner does not check the Vel * Vel / Accel criteria. Example – Arc with BSPLINE and timeSlice = 5 msec and Arc with PVT (1 msec). The arc velocity is 100,000 and acceleration is 10,000,000. The BSPLINE arc velocity and acceleration is about 10% lower due to the 5msec timeSlice to illustrate the path differences with larger timeSlice values.
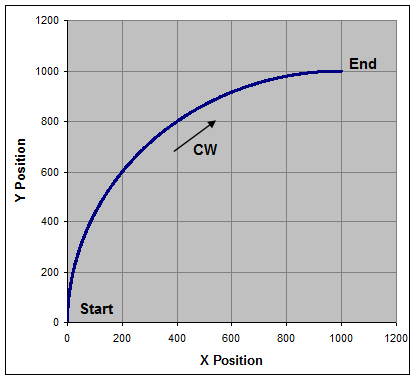
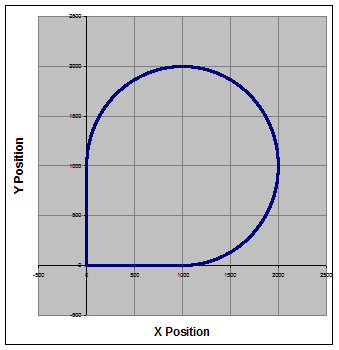
Tips for Best PerformanceGenerating the best path for your application is a compromise between smoothness, path error, number of path sections, number of points, path velocity, and acceleration. It is a good idea to experiment with a few representative paths to determine which interpolation type and parameters will work best for your particular machine. Here are a few tips that will be helpful. Try PVT and Bspline move types first. These types offer the best balance between smoothness and low path error. The other move types (PT, Bessel, Cubic, etc.) are generally not recommended. Use PVT for best path accuracy, time optimal profiles and/or host systems with insufficient point streaming capability. Use Bspline for smooth paths or systems with poor acceleration response. Use Lines to lead-in and lead-out Arcs so the line-arc junctions are tangential. For PVT interpolation, this will eliminate the blending between lines and arcs, for the lowest path error and smoothness. Example – Good practice, lines are tangential to arc start and end. Start and end at 0,0.
Example – Bad practice, lines are at 90 degree angle to arc start and end. Start and end at 0,0. Notice the speed reduction and corner rounding to blend between the lines and arc.
For PVT, SCURVE works really well for lines and reasonably well with arcs. If there are line-arc or arc-arc junctions that are not tangential, then there can be some minor velocity overshoot during blending. |
||||||||
| | | Copyright © 2001-2021 Motion Engineering |