|
|
| . |
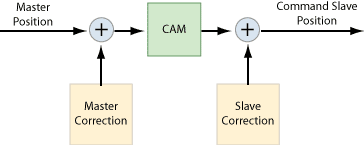
Correction MovesMaster-Slave Concept | Camming | Correction Moves IntroductionCorrection moves can be superimposed on cam moves. These moves allow the controller to counterbalance small offsets and biases that will accumulate over extended periods and will affect the relative positions of the master and slave axes. Correction moves can either be injected before or after the cam calculations. Normally only one correction is used. The physical effect that you are trying to negate will dictate which type and when the correction move will be used. Injecting a master correction will advance or retard the cam/gear and injecting a slave correction will offset (bias) the resulting motion.
There are no restrictions on the size and type of corrections that can be applied. Large moves would normally be applied when starting a cam and small moves would be applied periodically to compensate for biases, drifts, or slippages. The correction axis can be used to generate any type of motion, but in most cases, a small position move (eg. trapezoidal or s-curve) is sufficient. The corrections are generated by another motion and axis object. This correction motion and axis object are normally not used to control any physical motor, but can be thought of as a virtual or pseudo axis.
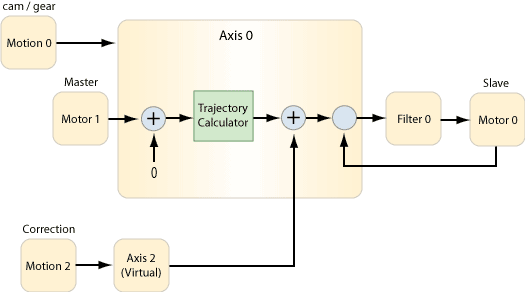
Creating a Virtual AxisBy default, the MPI configures each axis to use a filter and motor object for controlling a physical motor. But for generating corrections, the axis and motor objects will need to be set up to operate as a standalone axis that is not relying on any hardware. The following MPI code shows how to change the default configuration of Axis 2 to be a virtual axis.
This code makes two changes:
Linking Axes for Master CorrectionsThe masterCorrection field of the MPIAxisConfig structure is used to make the connection between the correction axis and the slave axis. Setting this field to the axis number of the slave axis makes the connection. Setting this field to -1 breaks the connection. Here is the MPI code for setting the master correction source to Axis 2.
Here is the MPI code to disable the master correction from being applied.
Linking Axes for Slave CorrectionsThe gear configuration fields of the MPIAxisConfig structure are used to make the connection between the correction axis and the slave axis. The gear configuration of the slave axis needs to make its source the command position of the correction axis and enable the gear feature by setting the denominator (Ratio.B) to one. The correction axis can be disconnected from the slave axis by disabling the gear feature of the slave axis by setting the denominator (Ratio.B) to zero. Here is the MPI code for setting the slave correction source to Axis 2.
To disable the slave correction source, set the gear ratio to zero:
How to Command a CorrectionSince we now have a separate motion and axis object for corrections we can use this to command any type of correction move at any time. Usually, the correction moves will be small position moves, for example trapezoidal or S-CURVE moves. For example, here is the MPI code that applies a correction of 10 counts in the form of a trapezoidal move.
|
||||||||||||||||||||||
| | | Copyright © 2001-2021 Motion Engineering |