|
|
| . |
|
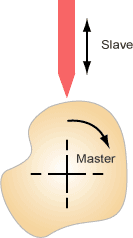
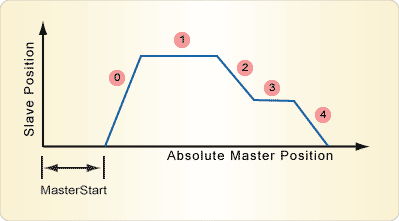
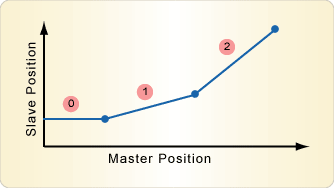
Camming Master-Slave Concept | Camming | Correction Moves A mechanical cam consists of a shaped rotating form and a follower that tracks its surface.
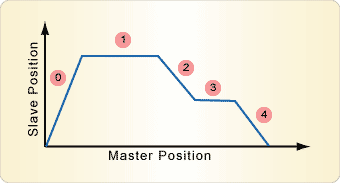
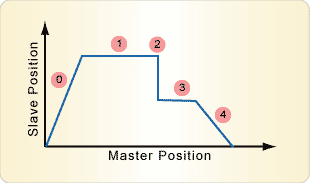
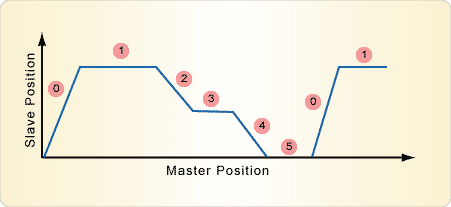
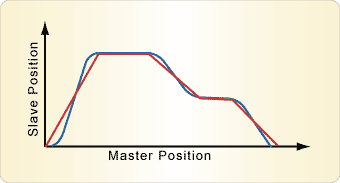
You can achieve the same relationship between the master and slave positions using electronic control. The simplest way is to define the relationship between the master and slave positions as a series of linear segments.
For each segment you need to define the distance that the master will move during the segment and the position that the slave will achieve at the end of the segment. This cam profile will be represented by the following cam table.
NOTE: Cam segments are numbered from zero.
For cam moves (and other master slave motion), we need to define the source of the master position. The MPIAxisMaster structure, part of the axis configuration structure, is used for this purpose. The type enumeration defines the source of the master signal—either a motor object's primary or secondary encoder, or an axis object's actual/commanded positions. The index field specifies the number of the object. The following code demonstrates how to use the secondary encoder of Motor 2 as the master position.
Single Shot Cams A single shot cam is a single pass through a cam table. As the master's position increases, the slave position will follow the cam trajectory. When the end of the cam table is exceeded, the motion will stop and the axis will return to the idle state.
The following MPI code implements this cam profile.
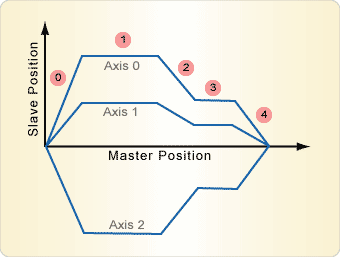
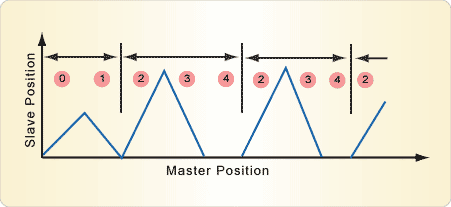
Multi-Axis Cams The cam motion type is also able to start multiple axes simultaneously. If you use a motion object that has multiple axes mapped to it, the motion start function requires that you provide an equivalent number of cam profiles. All the cam profiles share the same master distances and any supplied motion attributes, but the profiles of each of the slave axes are independent. The following MPI code would generate three different slave profiles.
Here are the resulting cam profiles.
Relative Cams By default, the cam table defines the slave positions as absolute positions. But using a RELATIVE motion attribute when starting the motion will indicate that each slave position in the cam table is relative to where the previous cam table segment finished (or the slave's original start position, if it is the first slave position). For example, we can generate the same cam motion as in the previous section by using the relative attribute and a different cam table that defines how far the slave moves in each segment.
Reverse Cams By default, as the master position increases, the cam will progress through the cam table. A reverse cam progresses through the cam table as the master position decreases.
A reversed cam is defined by specifying negative master distances. Specifying a set of master distances with positive and negative values cannot be realized. When defining the array of master distances, all the elements have to be the same sign, otherwise the MPIMessageARG_INVALID error is returned.
Zero Master Distances A master distance of zero is a valid value. Specifying a master distance of zero will generate a step in the slave's position. In most applications, this step would not be desirable; therefore it is typically not used.
This MPI code would generate the following cam profile.
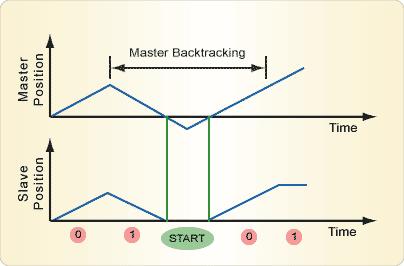
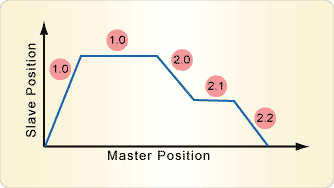
Reversal of the Master - Backtracking By default, cams will backtrack through the segments of a cam table if the master changes its direction in the middle of a cam table. If the master goes beyond the start of the cam table, the initial position of the slave will be held until the master returns to the start position. Using the cam from the previous examples we would get the following trajectory if the master stopped during the first segment, reversed past the start of the cam table, and then moved forward again to the end of the cam table.
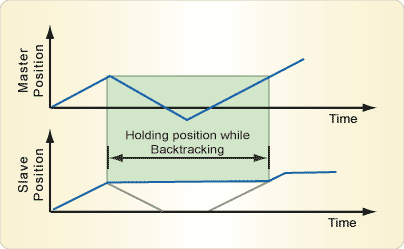
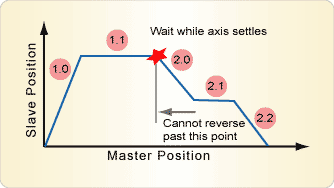
Reversal of the Master with NO_BACKTRACK_HOLD This default backtrack behavior of a cam can be overridden by using the NO_BACKTRACK_HOLD motion attribute. If the master changes direction when the NO_BACKTRACK_HOLD attribute is being used, the slave will hold its position until the master returns past the position where it was reversed.
The following plot shows how the slave's position would look using the NO_BACKTRACK_HOLD attribute in comparison to the default case.
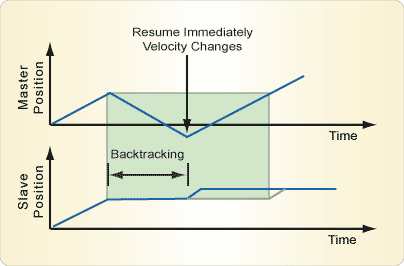
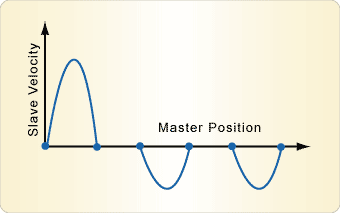
Reversal of the Master with NO_BACKTRACK An alternative behavior when the master reverses can be generated by using the NO_BACKTRACK motion attribute. If the master changes direction when using the NO_BACKTRACK attribute, the slave will hold its current position until the master resumes in the original direction. The cam is resumed immediately and the master resumes in the original direction. If the master does reverse direction when using the NO_BACKTRACK attribute, the phase relationship between the master and the slave will be lost. The NO_BACKTRACK and NO_BACKTRACK_HOLD motion attributes cannot be used at the same time. If they are used at the same time, the MPIMessageATTRIBUTE_INVALID error is generated.
The following plot shows how the slave's position would look if the NO_BACKTRACK attribute was used, in comparison to the NO_BACKTRACK_HOLD case.
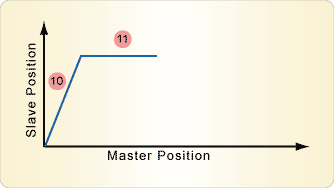
Starting at Specific Master Positions By default, cams start immediately after the mpiMotionStart function has executed and the master distances are specifying the offsets of each of the cam segments relative to the previous segment or the master's position at the start (if it is the first segment). Using the MASTER_START motion attribute allows the exact position of the master at the start of the cam to be specified.
In this case, the cam profile will start once the master has moved passed the masterStart value. While the master's position is less than the masterStart attribute, the slave will hold its current position.
Appending Cam Segments In some applications the whole of the cam profile may not be known at the time the motion is started. For example, the slave positions or master distance for the last few segments may be calculated from data collected during an earlier part of the motion. In these cases, the initial segments of the cam can be started (as previously shown) and the APPEND motion attribute can be used to extend the cam with the extra segments. Only one type of appending operation can be performed. This is the mpiMotionStart with the APPEND motion attribute. For example, we can start a cam by using the following MPI code.
The above MPI code gives the following initial cam profile.
Then you can append the remaining part of the motion by using the APPEND motion attribute.
The above MPI code gives the following full cam profile.
Cam table segments can be appended many times in a row, which allows the cam tables to be spooled to the controller as the master progresses. This spooling allows cam tables to be calculated on the fly. There are some side effects of using mpiMotionStart for appending cams together since the two cams act as separate moves. When transitioning from the first cam to the second cam, the controller will wait for the axis to settle. Once it has transitioned to the second cam, the slave will only backtrack to the start of the second cam.
By default, if mpiMotionStart is called and any of the axes are already in motion, then the function will return the MPIMotionMessageMOVING error. But, if you use the append motion attribute, it changes this behavior and an error will not be generated.
Stop, E-Stop and Abort Actions The three standard actions Stop, E-Stop, and Abort are either generated by calling the mpiMotionAction function or by autonomous limit actions in response to events like hitting a hardware limit switch or an encoder fault being detected. These actions will continue to operate in exactly the same way as they previously did—ramping to zero speed (Stop or E-Stop) or immediately setting the speed to zero (Abort).
If the master position source is an external position source, i.e. an encoder connected to a SynqNet node, then if an encoder fault is detected on that encoder you may want the slave axes to abort. You can use the encoderFaultMotorNumber field in the axis configuration structure to specify which motor number should be monitored, and if an encoder fault is detected on the motor, the slave axis will perform an ABORT action. Setting the encoderFaultMotorNumber to -1 stops the slave axis from monitoring any motors encoder faults. The following MPI code shows how to set up the master encoder's fault monitoring.
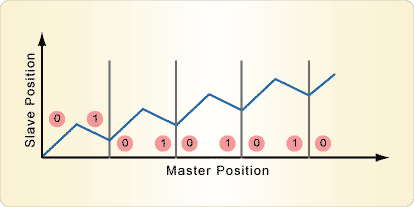
The previous examples have shown a single shot cam, i.e. a cam that does one cycle and then stops. To truly mimic a mechanical cam, the REPEAT motion attribute can be used. This motion attribute will automatically return to the start segment immediately after the cam has finished. If the master is travelling backwards then the cam will also switch to the end segment when moving past the start of the cam. When using the repeat motion attribute, you always need to specify the repeatFrom field in the motion parameters structure. A value of zero will indicate that the whole cam table provided is to be repeated. Further details of the repeatFrom attribute are in the following section.
Here is what the MPI code looks like for a repeating cam:
Run-In to a Repeating Cam -repeatFrom Attribute When a repeating cam is specified, you can specify that some of the cam segments are used to start the cam, i.e. these initial frames act as a small single shot cam that leads into the remaining segments, which will continuously repeat. The repeatFrom specifies the first cam segment that will always be repeated. If you set this attribute to zero, it will make the whole cam table a repeating cam. The following example shows how a repeating cam is started where the first three cam segments in the cam table are acting as a run-in.
Cumulative Bias with Relative Repeating Cams If a relative repeating cam is specified, but the cam does not end at the same position as the start position (the sum of all the relative distances does not equal zero), the cam generated will still be continuous in position. As a result, each time the cam repeats, a slave axis will accumulate a bias. NOTE: If the start and end positions of an absolute repeating cam do not match, the slave position will not be continuous and a jump from the end to the start positions will occur each time the cam repeats. The following MPI code shows a relative repeating cam where the end position is 50 counts away from the start position.
This code generates the following slave profile with a continuous slave position between each repeated section.
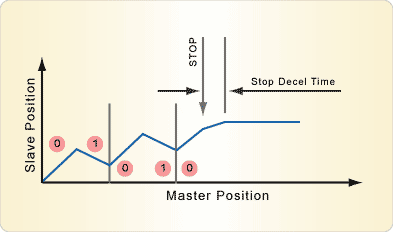
Stopping a Repeating Cam There are two ways of stopping a repeating cam and returning the axis to its idle state. The first would be to issue a STOP action.
This would immediately stop the cam motion and decelerate the axis to zero speed within the stop time preconfigured into the motion object. The cam cycle would not be completed and the deceleration would not be linked to the master's speed.
A more controlled stop is achieved by using the CANCEL_REPEAT action. This will allow the current cam cycle to be completed before it finishes in an idle state.
The following profile shows the CANCEL_REPEAT action being called during the first segment of the cam.
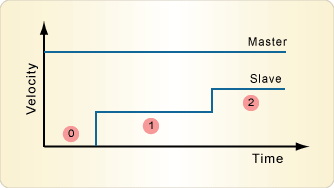
Linear Interpolation Up to this point the examples have been linearly interpolating the slave's position during each cam segment.
If we assume that the master is at constant velocity, then the velocity of the slave will also be constant during each segment with a step change in velocity at the transition to the next segment.
While this type of linear interpolation is fine for a cam with many small segments, these velocity steps may cause problems where cam tables only have a few segments with large velocity steps.
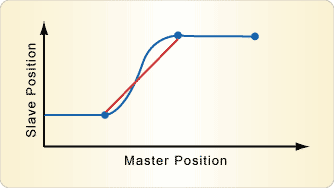
Cubic Interpolation This interpolation method fits a cubic trajectory between each pair of cam table entries.
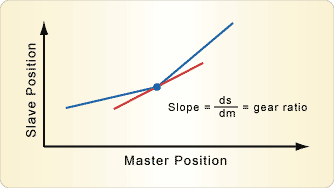
In order to allow the cubic curve to be fitted properly, extra information must be supplied, in addition to the slave's position. The desired slope at each point of the cam table is also required.
This slope (the derivative of the slave position with respect to the master position) is also called an instantaneous gear ratio. This type of interpolation gives a smooth position trajectory that passes through each of the specified points, and the velocity is also continuous. Cubic interpolation is defined by using the CAM_CUBIC motion type. (The CAM_LINEAR motion type is used for linear interpolation.) When using the CAM_CUBIC motion type, the slopes at each of the cam points also needs to be supplied using the gearRatios field of the motion parameters. The following MPI code shows how a cubic interpolation is specified.
The resulting position profile would look like the following profile:
This is the velocity profile:
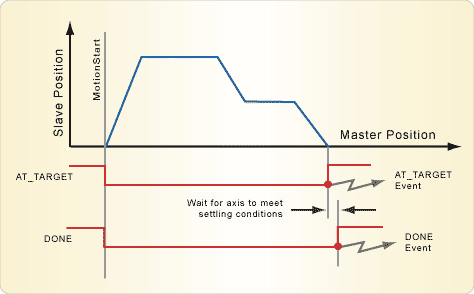
Motion Events and Event Status Flags During a cam motion, two status flags, DONE and AT_TARGET, reflect which phase of the motion is currently active. The DONE flag is cleared immediately once the motion starts. It will return to a set state when the motion has stopped and the axis has settled. The AT_TARGET flag will be set when the cam profile has been completed and is clear, while the cam is being performed. Associated with each of these flags are two corresponding events. These events can wake up a host program's thread of execution each time the corresponding flags are set.
The following MPI code shows how to poll the current status of the DONE and AT_TARGET flags.
The MPI's Notify object can be used to pause a host program until an AT_VELOCITY or DONE event is generated.
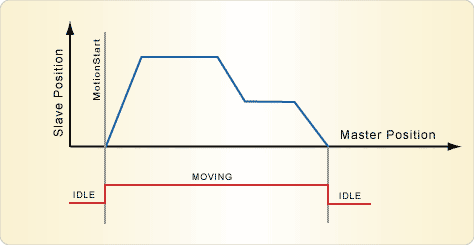
Motion State During the execution of a cam motion, the motion object maintains a motion state machine. While the cam is being performed, the motion state will be moving and change to an IDLE state once the cam has been completed.
The motion state can be polled using the following MPI code.
Increasing the Maximum Cam Table Size The motion controller uses a frame buffer to hold the cam table while it is being executed. The only configuration for the frame buffer is its size; the size affects how many cam points can be in the cam table. You can look at the axisFrameCount field of the controller's configuration to find out how many frames the controller is configured to use.
If you try to use a cam table that is bigger than what can be accommodated by the controller's frame buffer, the mpiMotionStart or mpiMotionModify functions will return the MPIMotionMessageFRAME_BUFFER_TOO_SMALL error message. The controller uses some of these frames to start and
stop the cam motion; the remaining frames hold the cam table. For example,
if the frame buffer size is 128, the maximum number of cam points that
can be used is about 122. However, if other motion attributes are used,
the maximum number of cam points is also reduced. You can change the size of the frame buffer by adjusting the axisFrameCount field of the controller's configuration with the following code.
The frame buffer size must be a power of two (i.e. 64, 128, 256), otherwise the mpiControlConfigSet function will return the error code, MPIControlMessageAXIS_FRAME_COUNT_INVALID.
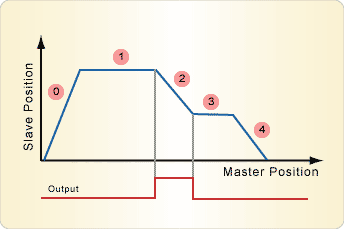
Controlling Digital Outputs Within a Cam Table - OUTPUT Attribute The output motion attribute allows digital outputs to be automatically controlled as the motion moves through the cam table. The following code shows how to set up a cam, where a digital output is required to be ON during cam segment 2. The output attribute array defines the actions that control digital outputs at the transitions between two cam segments. In this case, we need to turn ON the output at the start of cam segment 2 and OFF at the start of cam segment 3. If the cam backtracks across a transition between two cam segments that has an output action defined, then the inverse action will be generated. For example, in the case below, if the master backtracks from cam segment 3 to 2 then the output will be turned ON.
The following plot shows how the output toggles with respect to the cam motion.
DELAY Motion Attribute The delay motion attribute allows you to specify time delay before the cam motion starts. By specifying the delay attribute (as shown below), the cam motion will wait 2 seconds after the mpiMotionStart is called before the cam will commence.
Master/Slave Latency The controller processes the Motion Supervisor, Axis, Filter, and Motor objects in numerical order (0, 1, 2, etc.). When using camming, make sure the Master axis number is less than its Slave axis number(s). This will guarantee that there is a minimum amount of latency between the input to the Master and the output to the Slaves. Suppose there is one Master axis and two Cams. Here are some examples of recommended and non-recommended axis configurations:
Process Map Configuration If the Master axis number is greater than a Slave axis
number, then there will be a one sample delay between the Master axis
input and the calculation for the output to the Slave axis. For some applications
this latency may not be an issue. If the latency is an issue and the axes
cannot be ordered for optimal performance, then custom controller firmware
might be an option. But, the added processing of re-ordering the calculations
will reduce the firmware performance by 10% to 20%. If your application
requires custom firmware with a configurable process map, please contact
MEI. |
|||||||||||||||||||||||||||||||||||||||||||||||||||||||||||||||||||||||||||||||||||||||||||||||||||||||||||||||||||||||||||||||||||
| | | Copyright © 2001-2021 Motion Engineering |